Welcome to my blog

Welcome to my blog and thank you for visiting today, I hope you will stay a while. Slide shows are at the bottom of this page. Follow my blog with Bloglovin


Showing posts with label Distress Ink. Show all posts

Thursday, 17 September 2015

The house that Cazzy built - fit for Tim Holtz?


I commented on a fantastic project by the lovely Alison (whoops, forgot to link to it - I have now), and she came back to visit me and commented on one of my little houses saying if I could make one in the style of Tim Holtz I could enter it into the monthly challenge at A Vintage Journey, so I thought and I thought, and I thought some more and this is what I came up with - eventually! It has taken about a week to make this, and I could probably still finish a couple of bits off like the drawer inside and out!

First of all I cut a house out in kraft card using the Zing and the 3d Houses file from The Cutting Cafe. I decided to make the house opening so lined it with distressed looking "wallpaper" which is from a pad by Me and My Big Ideas (MAMBI), and all through the assembly I have used my Tim Holtz Tiny Attacher where I could to strengthen the structure in addition to using adhesives. Sadly the plastic spring on the Tiny Attacher keeps coming off - this is a bit annoying as I haven't had it all that long or used it a great deal. I think it was in a closing down sale too, so I can't complain to the seller.


I decided to use one of my brand new (NBUS) bargain dies from Sizzix, the brick wall strip which is an Alterations long Sizzlet style die. I cut out the "mortar" first and knocked out all of the bricks, then cut it again in a few colours for the bricks. Then the fun bit, I added some of the mortar to carefully selected house corners and began to add the bricks (sticking each one with Cosmic Shimmer glue) - this was a lot more difficult that I imagined.  The die didn't cut properly, or at all using the Crossover, and I had to get the Big Shot out, it still didn't cut right through but I think it was because I didn't have the die facing upwards, will try again on the Crossover to see if that solves it there as I was just thinking I could maybe sell my Big Shot when this happened.
Anyhoo - every single brick seems to be different, so finding the right bricks to fit the holes took several hours that evening.......and the next day..... and next evening......! I really think I could have built a real brick wall in the time it took, and then I decided that the chimney would just have to match so many more hours later..... it was like a nightmare jigsaw, or some sort of mad skills test!

I should add that I live in a red brick house, I love bricks. Our bricks were hand made by a small brick company near Brighton, I remember going down there to get a few more when we built the conservatory, but by the time we built my craft room the small company was no longer, or had been taken over, and now it is really hard to match the bricks we have on the main house.

The panels on the outside are draughtsman type house plans by Karen Foster (I thought of Tim and his plans of things), and I tore or curled corners to expose the bricks, after inking the edges of the plans with Aged Mahogany Distress Ink. Also when we bought this house many years ago it wasn't even built, so we saw another one and the plans!
We don't have any top hatted men however, or even top hats here!

The house base is covered in a panel of an old book page cut out with another brand new die (NBUS) - the Confetti Alterations strip die by Sizzix, which is inked with various shades of green Distress ink, then the puddle holes are painted with Sky blue Distress paint, brown Crackle Distress paint in other holes, then Rock Candy Distress paint on top of the dry Sky. The Rock Candy is a new jar (NBUS?) I won in some blog candy from Katy - thanks again Katy, just as well as the little I had was totally dried up!
On the front apex is a NBUS pocket watch charm from That Craft Place, tied up with some Tim Holtz paper string.


I have made a modification to the box base, I hope Regina doesn't mind, I wanted a little drawer in the middle and it isn't brilliant but it works, and is full of treasure! The drawer knob is a children's wooden bead which was green but has been toned down with Peeled Paint distress paint.

The back of the base has a scene cut with a Sizzix on the edge Alterations die called Townscape. At the front of the house the Sizzix Umbrella man is making his way home, I bought a stamp set with him in too and was disappointed to find that on this first time of using both the die and stamp that they are not the same size at all! Never mind I stamped on the die cut anyway, and filled the gap below his knees!
 See the birds stamped from the same set on the house?

I added Black Soot Distress ink to the chimney bricks, seemed appropriate somehow!

Oh dear Umbrella Man looks a bit bendy!

Peeping out from most of the windows are top hatted men, stamped on a background of the paper used inside of course - so that when you look in the windows you will see what is inside (trick)! The stamp set is another Tim Holtz Stamper's Anonymous set, which I don't think I have used before (NBUS).

Doors and windows are cut from wood grain gold card, inked a little and two brads added for doorknobs.

Round the side I added some On The Edge Sizzix Alterations spooky twigs, and some of the confetti as flowers, some inked with Distress ink. This is the sunny side of the roof, grunge paper embossed with a Texture fade and inked as per the Compendium of Curiousities Vol I. The sunny side had to be the chimney side, anyway it is raining the other side - see the umbrella and puddles?

I've added Tim Holtz Tissue Tape to the rest of the edges of the base.


Now the roof, which as I said opens. I realised after the Christmas box, well after I stuck the chimney on and it was too late, that I should have stuck another roof piece on top of the opening piece so that the sides actually match (so I didn't show the photo of the opening side deliberately). This time I have not only added the relevant piece I have added another layer of Grunge Paper, which I embossed with Sizzix Tim Holtz Texture Fade embossing folders, on one side a sunset and the other arrows, the arrows is a brand new folder and I haven't used either before. I used a technique from the Compendium vol I where you emboss Grunge Paper, ink it with Distress ink with the Ink Blender then swipe it with a Distress Ink pad in a contrasting colour. The reason for the extra roof piece - Grunge paper is a little soft and bendy and I wanted it to be strong and last a long time! I searched everywhere for the Grunge Paper, just so I could do the Inking Grunge Paper technique, and finally when I didn't know where else to look I spotted a dusty folder I had missed!


To the roof on the arrows side I added a Tim Holtz spinner (NBUS), and a Tim Holtz File marker (NBUS) which I recently received in Katy's blog candy that I won. It really is a 9 but upside down is a 6 ("cos" I live at number 6), and I can open the roof with it. I added a star button to the game marker - just felt the urge to add something!

I also used a Word Key by Tim Holtz, and the rest are in the treasure drawer.

I hope I can post this to not only show you but enter in two challenges in particular, A Vintage Journey Home Sweet Home challenge, where all entries must have something Tim Holtz inspired included (I think I have managed that lol), but also the NBUS (Never Before Used Schtuff) challenge at the lovely Darlene's blog which is ending tomorrow! Then I need to choose two more worthy challenges very carefully, there is a 4 challenge rule at NBUS and this is so special it needs special challenges! As I didn't win the NBUS and it is over I am ignoring the rule now - because I found another special challenge.)
At the time of typing  all of this Blogger is refusing to let me select any photos and shouting "Error 400" at me every time! I hope I can add the photos to the words soon, or it will be too late! Sorted, but all my cookies are now deleted so I have to put passwords in all over again etc.


I've added a few charms and some treasure gold to the drawer knob and drawer, and a metal button to the end of the knob.While I was looking for buttons I found a wire twist tag that reads "love begins at home" and added that to the number 6. It's amazing the difference Treasure Gold can make, I am happy with my drawer now.
See the two dogs (one on the way to the front door and one by the bricks on the side - looking at the bone), and a bone on the garden for them? We have two dogs at home too.

Challenges entered:
NBUS -Anything goes
Ike's Art - one for the men (Tues)
Pan Pastels Love 2 Create - #19 mixed media (Sun)
Simon Says Stamp - die crazy (Wed)
Country View Crafts - numbers (Sept)


Awards.

A Vintage Journey - Home Sweet Home (Sept)


Tuesday, 11 August 2015

Stereotype!

 This is a mixture of stamps and hopefully will be ok for at least two challenges I want to enter.

The typewriter doll is by Lost Coast, her sexy legs are by Unity Stamps, the circles and spirals are Rubber Dance stamps, and the type stamps are Craftwork Cards.

You might remember my altered French/English dictionary which I started as part of The Craft Barn challenge last year - well this is another page I have done in that dictionary.
The page is painted with white gesso, the typist is stamped on white card and coloured with Promarkers and a Distress marker, circles and spirals are stamped in Distress inks and the torn edges are inked with Distress ink.
The small Rubber Dance circles have words in them and say: "you are unique and so am I" and "this is different" - I think it is! She has typed - "I am not A Stereotype".
When I got careers advice a very long time ago the adviser thought all girls should become typists, he didn't like it if you wanted to become anything else!
I have a list of challenges I want to enter to try not to forget, and already one has passed by so I have to add a different one for that.

Challenges entered:
That Craft Place - anything mixed media (Sun)
Love to Create - #16 anything mixed media or inky (Sun)
The Craft Barn - pens (Sun)
Lost Coast - circles (you can use any stamps) (7th ASept)

Rubber Dance - colour challenge (Aug - 7th Sept)


Sunday, 9 August 2015

Country roads take me home...


I have two sets of Artistic Outpost stamps which I bought in a closing down sale, and I wanted to enter the Artistic Outpost challenge so I thought I would have a go.
I have stamped some of the images in shadow ink, decoupaged the truck which is coloured with Promarkers, and cut out the second set of words and re-arranged them around the Home stamp. I sponged the edges with Distress ink, and stamped the clock faces with it too. Home is metallic blue. 
I folded and cut a gold pearlescent card blank to mount it on and added some blue and white baker's twine.


Challenges entered:
Simon Says - tie it up (Wed)
Addicted to Stamps - anything goes (Wed)
We love to create - anything mixed media or inky goes (Sun)
Artistic Outpost - verses and greetings AO stamps (Aug)
The Artistic Stamper - anything goes (Aug)

Wednesday, 29 July 2015

A swallow's journey

I used my Rubber Dance stamps again, and this time I used this gorgeous swallow stamp stamp on kraft, coloured with Prismacolor pencils and masked to stamp some background before die cutting with a Sizzix stamp die. I added some Tim Holtz paper string to one side of the die cut and a boat charm to the waves.
Then I decided to add another background, using a stencil and Distress Ink I sponged some waves and stamped the bird in Ranger Van Dyke Brown. On the Kraft card it is stamped in black, as is the shell and the "waves". 
The card I used for the card blank is textured and that showed through the inking. My bird is on a migratory journey over the sea - can you tell?

This card has swooped into the following challenges:
Rubber Dance Blog - colour and travel (July)
Craft Stamper - take a stamp anything goes (Jul)
Left of Centre - use texture (Fri)
Graph'it Markers - colour Duos (Fri)
Love to scrap - anything goes (Aug 2nd)
We love to create - #15 anything mixed media/creative/inky goes (Sun)
Vintage Stamping - #34 travel (Sun 3rd)
Papertake Weekly - take your pick blue and green (Tues)
A Sprinkle of Imagination - anything goes with something from the shop (Jul - Aug 11th?)
Fab n Funky - no patterned paper (Aug 11th)

Fussy and Fancy - #144 things with wings - picked randomly to be GD

The dance of life

Rubber Dance that is! I finally got to use some of the stamps from my wonderful prize from Bibi of Rubber Dance, I posted about them and the very arty envelope they arrived in a couple of weeks back.
So here is another tag to add to my stamp folders to identify which stamps are where, and this is a case of the last stamps to arrived get tagged nearly first, as you might remember I did complete one tag ages ago! I cut a second tag from Kraft after stamping and colouring the image, with Memento Ink and Prismacolor pencils - not the best combination but I didn't attempt to blend the pencil so the ink survived - Stazon next time. I stamped the couple and two words - "together" comes with this stamp, then added colour to fit the Rubber Dance challenge which is a colour challenge with optional theme of travel. You don't have to have Rubber Dance stamps to take part either.
This could be a couple on vacation or honeymoon, they look so happy!

I added some blue lace and mother of pearl heart buttons, I distressed the edges and inked with Distress ink in Mahogany.

This is the back of the tag, a montage of some of the other stamps I won.

I am entering the following 4 challenges:
Anything but a card - anything goes (4 challenge rule) End July?
Rubber Dance blog - see colour and theme above (July)
The Artistic Stamper - tags (July)
Craft Stamper - Take a stamp anything goes (July)

Tuesday, 5 May 2015

PaperArtsy tag

This is the start of a project I planned ages ago, to label each of my stamp concentina files so I know what is in them without getting them out. Some of the folders are dedicated to one make of stamps and others have more than one, and one is all the odd sheets of stamps.

This folder is purely PaperArtsy (arghh - when I went to bed and thought about it - I realised what I had said, of course Dylusions are not PaperArtsy, so this is a mixed folder for now, whoops), although this isn't my whole collection - there is a Really Useful Box full of the small size (A5?) sets also. 
I was putting away some stamps I bought in January I decided to make the tag. The tags were cut with a Tim Holtz Sizzix die a long time ago and all from greyboard packaging so a bit of recycling going on here too. I roughly painted the tag with some  Blush Fresco paint, then went over it with South Pacific which is not solid so the pink shows through. Then I stamped each side, this side is PaperArtsy original type stamps. I edged the tag with Distress inks and Treasure Gold, and finally stamped and die cut a "moff". I don't want to add too many 3d details, I think they will end up getting knocked off when the folders are in use. String has been threaded through the tag and folder. 

This side of the tag is done with Dylusions stamps, and JOFY stamps and coloured with Distress markers and Promarkers.

One down around 10 to go!

I have entered this tag in the following challenges:

Country View Challenges - simply scenic (May - 10th June)
Crafting from the Heart - anything goes #58 Monday
Papertake Weekly - anything goes (Tues)
That's Blogging Crafty - Keep it Simple (May 8th)
Love to create - anything creative/mixed media goes (Sun)

Saturday, 25 October 2014

Autumn in Paris.

Julie is my Son Richard's Girlfriend, and I wanted to make a card that tied in with her main present from him, a trip to Paris - lucky girl! I didn't have as much time as I wanted to make this, so it is done in a hurry and maybe not as good as I wanted it to be. The reason for this was that on Thursday my mother in law had a mini stroke, and luckily a concerned relative rang us, and we spent a few hours over at her house finding out what happened, calling the doctor, waiting for the doctor etc. Then we dashed home for a quick and very late lunch while the doctor consulted the practice doctors, before she rang us to say she needed to go to the RUH in Bath for a CT scan.
So we set back off to collect her, after feeding the poor confused dogs, and take her down arriving at 4:30. At 9pm she had undergone examinations, blood tests, ECG, BP checks and was being wheeled off for a chest xray, and still hadn't had the CT scan, and we went home exhausted. 
Yesterday wasn't much better, we spent the morning updating concerned friends and family, getting the shopping that we weren't able to do Thursday done, and after lunch we had to go to MIL's house and find her some clothes and toiletrys, and  a nightdress, and her medication - she was there with nothing at all. Then we went back to the hospital and sat with her for a couple of hours before dashing home for the plumber, and to cook dinner.
Then I made this card very quickly so that Richard could take it with him, and Julie's present is Euros for their trip, I really should have made the card to fit the Euros but when I realised I had started this and was too tired and short of time to change it.

I used a Stampendous Luggage Lables background stamp which has a Paris stamp at the top, stamped with Distress ink in Dusty Concord. I wrapped a piece of black lace round this and adhered it to a blue and white striped card blank, then added butterfly corners (Filigree corners, La La Land die which I won), and an Eiffel tower die cut from silver glitter card with a My Favorite Things Dienamics die. I popped a couple of  mother of pearl heart buttons on, then die cut some Mini Wavy Pennants, also with a Dienamics die, in white and stamped Happy Birthday on them to fly from the top of the tower.

I think I will be safe to post this - I don't want to spoil the surprise.
Happy Birthday Julie!

I found a couple of challenges to enter:
That Craft Place - girls but no pink (Sun)
Vintage Stamping - used purple (3rd Nov)

Monday, 2 June 2014

Groundhog day?


It feels like it, here is the challenge book again (see previous post), this time with all its ribbons and with a couple of wings and a crown added to the front cover, I think the front cover is finished! I inked over the gold clock hands, and the cogs and wings, might take it off the wings and do something else.
I used the Time background to make the covers, and the Clocks full page background (both from The Cutting Cafe) to make the pages, which I creased to make pockets and lined with either clocks on purple or green card. 
I made some slips which are currently supposed to be one per challenge, you write the date it ends, the blog, and the details. When you complete the challenge you move it to the "DONE" pocket, when winners have been picked it can be recycled, or kept if won maybe in the spare pocket at the back.

I have collected a load of links to challenge blogs in my sidebar, I found a whole bunch of new ones yesterday too. I spent ages looking down the list to see if there is a new challenge, trying to remember if I entered the last one, or if there was a challenge I wanted to enter, then visiting them. When they post additional posts between challenges I lose the challenge, especially monthly challenges! So I thought this way I could keep track of challenges I hope to enter, and enter them in time, not have to hunt around for a blog that was doing ribbons and lace only to find I missed it, or couldn't find it again!
I am already thinking that maybe I should have created a page a day, and that would make the whole thing easier, and maybe not have a slip for every challenge but one for a blog, that can be put back with the new challenge so used again until full - I might have to try that!
If I start over with a seven day and one month book I will give this one away - if anyone wants it! Hmmm, would I have to make it 14 plus 2, for days of the week a challenge starts - or ends, and a done pocket for each day, and month? This could grow into a big book! I will just try this one for now and see how I get on.

Don't forget to hop over to Quirky Crafts and enter your make by Saturday!

This book is ticking over into the following challenges:
Avenue 613 - make something for yourself  (Sun)
Art by Miran - anything goes 7 (4th July)
Milkcoffee - anything but a card (June 4th)

Moving Along With The Times - no image (Thurs)
That Craft Place - ribbon and lace (Sun)
Crafts Galore - use a digi or stamp (Jun)


Sunday, 1 June 2014

It's still about Quirky Time!

It is reminder time for the Quirky Challenge, and this is my challenge book. It is not finished, I ran out of time, so I will add more photos later as I complete bits of it, in fact I could probably carry on decorating it for weeks! The idea is that I have pocket pages, and into the pockets I put slips with details of all the challenges I want to enter. 
I used Time background from our sponsor The Cutting Cafe, coloured with Prismacolor pencils, inked with Distress inks and edged with Treasure Gold. I found a few sheets of chipboard alphabets and decided to use those to spell Challenge, first colouring them with Krylon pen, then Treasure Gold. Real lace on the hinge side. The book is punched using my Bind it All, I had to watch the video tutorials again before I started using it and as you will see I wasn't totally successful in getting all the pages punched the same, and had to redo the back cover!
I got my Sizzix Tim Holts dies out to cut some metal gears and a weathered clock, and this would be so much further on IF the Ebosser had cut the metal instead of embossing mostly, cutting a little, and generally ruining my metal sheets. So out came the Trusty Big Shot which instantly cut them like they were butter, so another disapppointment about the eBosser, but gold stars to the Big Shot!
I tied on a few ribbons from Crafty Ribbons, more to be added later!

 I made 5 pocket pages, one for weekly, or fortnightly challenges to do, one for monthly challenges to do....
one each for weekly and monthly challenges completed, and one that is spare for now!
I hope to add some more photos later when I complete more, and I will show you the slips I am going to use in the pockets. I am so happy I finally did this even if it is a bit Quirky and not perfect!

Sunday, 23 March 2014

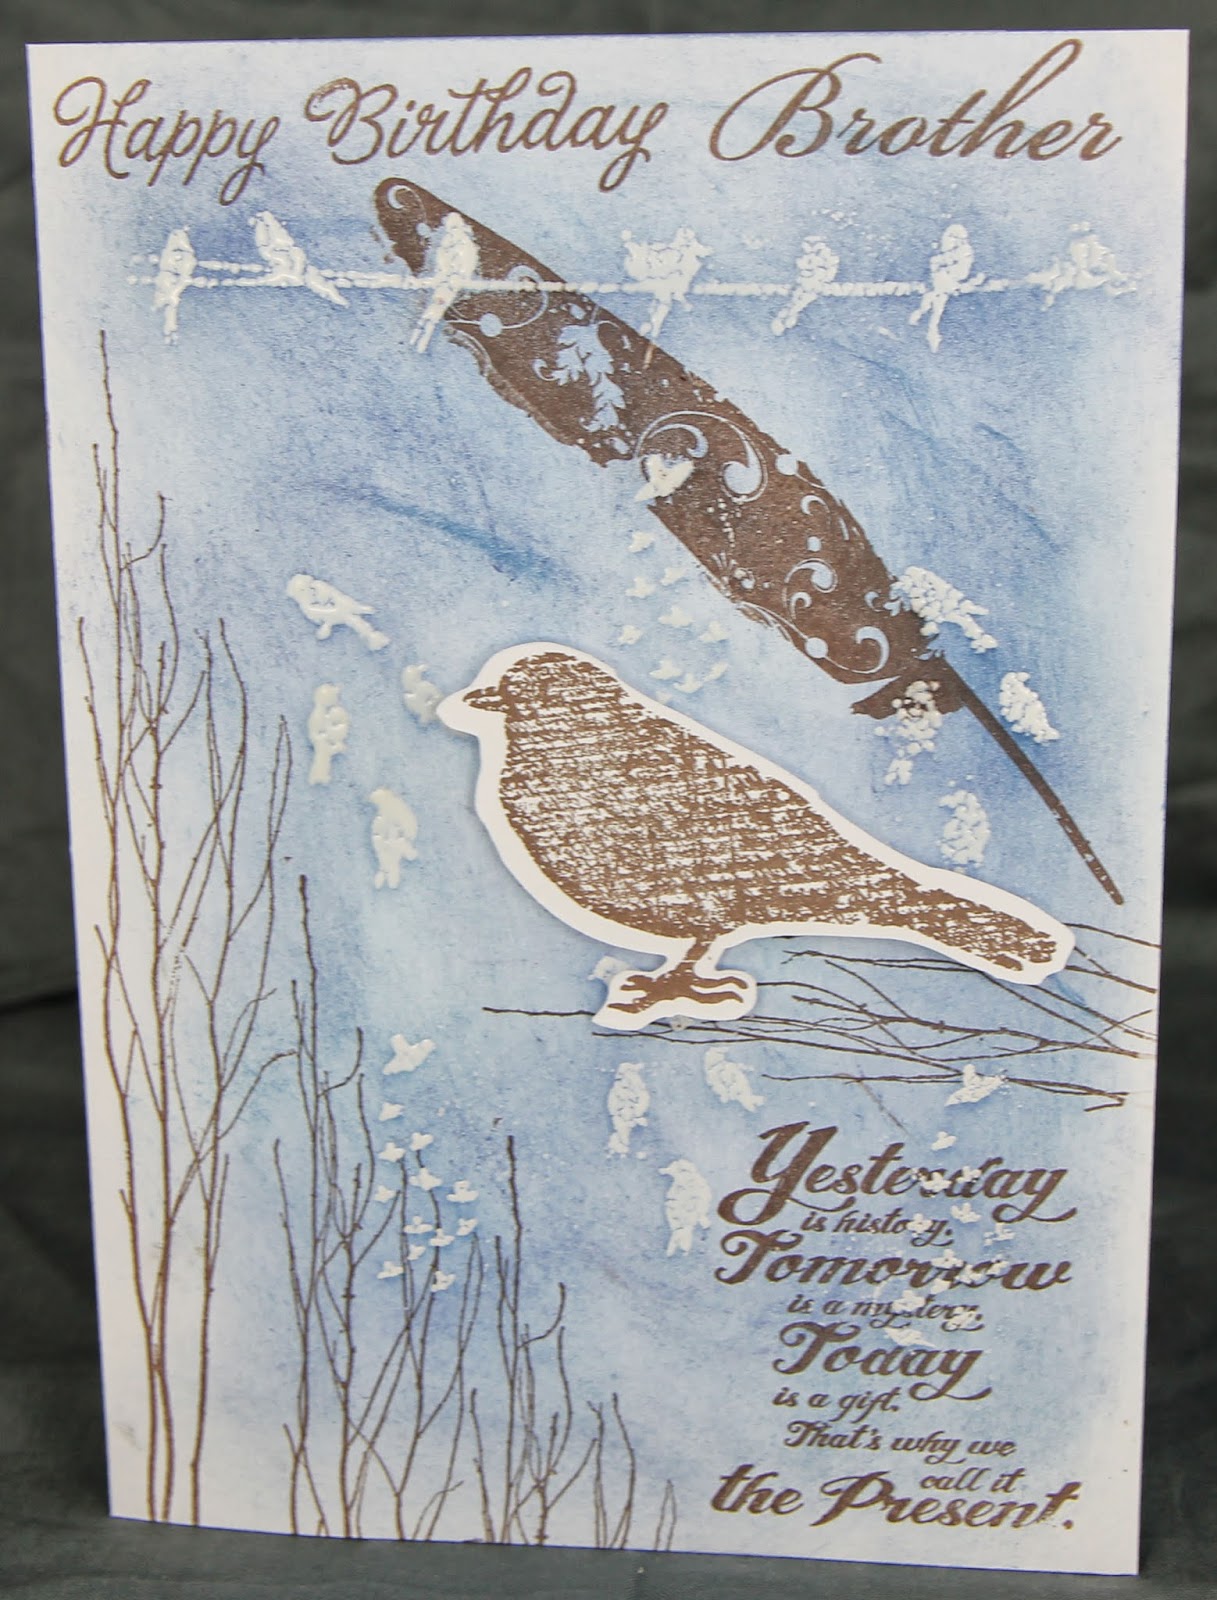
Happy Birthday Brother

 It was also my Brother's birthday yesterday, and he is a keen ornithologist so I made him a bird card. The background done directly onto the card blank is stamped and heat embossed in white and clear powder to form a resist, the stamps are Crafty Individual. Then I inked over the stamping with Distress inks and rubbed over the embossed images.
I stamped the branches, feather and bottom sentiment with Paperartsy stamps (rubbing over the embossed images again), and die cut then stamped the bird (I tried stamping then die cutting - which is when I found out the die is not the right way round to do that, I had to die cut, flip the die cut then stamp). Happy Birthday is a Hero Arts stamp, and Brother is a Papermania stamp.
Inside the card I used some Papermania Spring paper, also with blue and brown birds, and cut a slot to insert a gift card. Stamped sentiments are Paperartsy.
I was originally inspired to do the heat embossed background when a craft company on Facebook asked a question: if you used what you are wearing right now as inspiration - what sort of card would you make? I was wearing a dark blue fleece top with white silhouettes of birds all over it!
Happy Birthday Brother!

I have entered the following challenges:
Allsorts - All about the boy (Sat)
Cute Card Thursday - It's a wild world

Wednesday, 6 November 2013

The Craft Barn Alpha Challenge - N

The Alpha Challenge at The Craft Barn is on N, and I chose night in the English section of my dictionary. There was only one other option here for me and that is now glued down between pages! I don't think there was much in the French section either. See the stars at the top of the page? I wanted to stencil stars and the only stencil I had was sequin waste, and I used clear ink and holographic embossing powder which was heat set before applying distress inks to make my sky.

The owl on a branch, bats, sentiment and cat are by Cherry Pie Art stamps (and have featured before), the row of houses is a Hero Arts stamp, the branch on the right is Crafty Individuals and the moths are Paper Artsy, big moths don't you think, rather Dr Who like, the invasion of the giant moths!
I used various colours of Ranger Distress ink to create the sky, and finally I die cut a moon and stars from an Accucut Zipeslim die.


Wednesday, 3 April 2013

The Craft Barn Alpha Challenge letter R for rediger = to write


R for Rediger meaning "to write". I decided to do the history of writing from ancient Eqyptian, with Chinese, handwriting and typewriting.
This didn't go as well as I hoped, some of the Paperartsy stamps are finely detailed and those didn't really work on the gesso. The lady writing is by Inkadinkado, one I will be keeping because I love it. I see she is wearing a hat, and I was sure it was her hair last time - maybe I smudged it! There are lots of different stamps on here, some by Papermania Urban collection, Cherry Pie Art Stamps, Paper Artsy, Elusive Images? and more. It didn't look too bad until I decided to add ink blobs, and straight from the distress ink bottle, those drops were HUGE and I grabbed some kitchen paper towel to try and soak it up or it would have been much worse! (I almost didn't post this at all). On with the next word I think (I have a couple of words in mind, but one of them I thought I had stamps for and I don't so I either have to hand draw or forget it and the page is all prepared)!