Welcome to my blog

Welcome to my blog and thank you for visiting today, I hope you will stay a while. Slide shows are at the bottom of this page. Follow my blog with Bloglovin


Showing posts with label Paperartsy. Show all posts

Sunday, 3 January 2016

Let's Quirky Celebrate everything crafty!


YAY It's Quirky challenge time again, it is my challenge and the first of our new monthly challenges this year!
My challenge to you is to celebrate anything you like, but you must include the word Celebrate, or Celebration. 
I am celebrating having a new team, new monthly format, and the New Year.
We are sponsored by the wonderful Stitchy Bear Digital Outlet who provided the team with images to use, and are providing three prizes to our lucky top three.
Here are the details:
The digi I used is called Craft Queen by BB Kakes from Stitchy Bear, her craft room is way tidier than mine!
I took one chocolate box and stuck the inside into the lid to strengthen it, then painted it with white gesso before painting it with Paper Artsy Fresco paints. I painted it with Ice Blue then sponged Beach Hut and South Pacific over the top.
I cut a piece of designer printed paper by Me and My Big Ideas to use for the background and adhered it to the box. The image was coloured with Promarkers and metallic pens (and now I see what I forgot, meant to add some gems to the crown - will have to do that and retake).
I found some ribbon sliders spelling celebrate and added them and their ribbon to the top of the frame. Quirky is stamped with an Inkadinkado stamp and heat embossed in gold. DoCrafts scrabble tiles spell out the words round the frame, and some shiny red mirror mosaic tiles are dotted inbetween them.
The die cut corner is a Spellbinders Heartfelt die, and the other corner features tiny buttons. I added real shells, tiny cork stoppered bottles of glittery stuff and some freebie metal charms, an odd peacock feather embellishement and an exercise book embellishment that I hand wrote in. 
To finish it off I rubbed some Treasure Gold round the edge of the frame where the lid edge is.

Here it is from another angle, I made some changes to it from the original below (where you can still see wet glue)! I added two legs made from wooden beads, and I really thought it would stand up - it isn't standing without help! So, as I type, a third leg made from two beads is painted and drying, and I had to paint the back of the box today - now you can only see the embossed chocolate bars and make if you really look. I think I might have to decorate the back, all that blue space!
I added some gems to the crown, and drew some images on the stamps on the shelf, and added another little bottle, who knows what will appear on this next!


This is the chocolate box, the chocolates were a Christmas present from my hubby, he knows what I like!

Challenges entered:
Crafty Gals - #52 anything goes end of year bash and hop (5th Jan)
Tuesday Throwdown - #274 anything goes
Simon Says - Lets Party (Wed)
Cute Card Thursday - #406 anything goes 
Left of Centre - all things new (Fri)
Brown Sugar - New Year (Fri)
That's Crafty - anything goes (11th Jan)
Allsorts - what's new? (Sat)
Glitter and Sparkle - #169 anything goes (Sun)
That Craft Place - anything goes (Jan 17)
Love to Create - anything mixed media (24th Jan)
Crafts Galore - #25 anything goes (Jan)

Tuesday, 22 September 2015

Grow a weirdly beautiful garden.

I made this card in May, casing one in Craft Stamper  in the Summer Skies article in June 2015, and I sent off a photo of it to the magazine but I never heard a thing, so I guess it is safe to post it now.
The background was made by heat embossing clouds in white on watercolour paper before painting the paper in blues and lemon blending together to make green grass. My clouds stencil is pretty primative, I need a different one I think.

Then the background was stencilled with distress inks using Bundled Sage. The same JOFY flowers were stamped on white card and the heads coloured before cutting them out to add to the background. I used the butterfly and words from the same JOFY 11 set, I only have two sets and luckily had the stencil that goes with this set. Some of the stencilled flower heads were coloured with Distress ink in purple. I due cut the shape the words are on to make a blue cloud, using a Spellbinders die and more Brusho splatted card.
The colours you get with just a few grains of Brusho powder is astonishingly vibrant!

I decided to post this now because PaperArtsy have the perfect challenge - pigment powders, and there are lots of tutorials and fabulous examples using Brusho's, and other pigment powders, which I hope to have a go at too.

I have entered the following challenges:
PaperArtsy - #17 Pigment Powders (Sun)
We Love 2 Create - #19 mixed media (Sun)
Left of Centre - no designer paper (Fri)
Simon says stamp - Stamptember, die crazy (Wed)
Sweet Stampin - embossing (Wed 30th?)

Tuesday, 5 May 2015

PaperArtsy tag

This is the start of a project I planned ages ago, to label each of my stamp concentina files so I know what is in them without getting them out. Some of the folders are dedicated to one make of stamps and others have more than one, and one is all the odd sheets of stamps.

This folder is purely PaperArtsy (arghh - when I went to bed and thought about it - I realised what I had said, of course Dylusions are not PaperArtsy, so this is a mixed folder for now, whoops), although this isn't my whole collection - there is a Really Useful Box full of the small size (A5?) sets also. 
I was putting away some stamps I bought in January I decided to make the tag. The tags were cut with a Tim Holtz Sizzix die a long time ago and all from greyboard packaging so a bit of recycling going on here too. I roughly painted the tag with some  Blush Fresco paint, then went over it with South Pacific which is not solid so the pink shows through. Then I stamped each side, this side is PaperArtsy original type stamps. I edged the tag with Distress inks and Treasure Gold, and finally stamped and die cut a "moff". I don't want to add too many 3d details, I think they will end up getting knocked off when the folders are in use. String has been threaded through the tag and folder. 

This side of the tag is done with Dylusions stamps, and JOFY stamps and coloured with Distress markers and Promarkers.

One down around 10 to go!

I have entered this tag in the following challenges:

Country View Challenges - simply scenic (May - 10th June)
Crafting from the Heart - anything goes #58 Monday
Papertake Weekly - anything goes (Tues)
That's Blogging Crafty - Keep it Simple (May 8th)
Love to create - anything creative/mixed media goes (Sun)

Sunday, 8 March 2015

Quirky recipe reminder

 The first photos I took of my box were awfully dark, I thought the mini photo studio was faulty - luckily I took a look and it has 6 screw in bulbs and they were all loose, so phew it is working properly now!
I had this paper mache box on the shelf for a long time, and decided it was time to use it. This is my example for the Quirky Crafts Challenge reminder, the challenge is called Pretty in Pink, and is a recipe: pink, green, cream or white, flowers and ribbon or lace.
I painted my box with Paperartsy Blush Fresco paint and dabbed a bit of Rose Fresco paint on the lid. The images are from our sponsor Stitchy Bear's digital outlet and I used Dandy Flower by Floppe Latte (I think it is lovely) coloured with Promarkers, and a beautiful butterfly by Sentimental Susan which I coloured with Graph'its in Turquoise and pink Promarker pen before cutting out.
I painted over the whole thing with Ranger Rock Candy Crackle paint which is clear so a sort of crackle glaze really. When it was dry and cracked I applied some Treasure Gold gilding wax to the edges and all over the crackle glazed top. I added cream and pink ribbon round the lid and made a bow using the Bowdabra, ribbons and Bowdabra were from Crafty Ribbons.


I might need to add a bit of rose to the sides of the box. Inside I lined the box with pink paper printed with more butterflies in pink and green by Sentimental Susan. It is all ready to be filled up now, Mother's day is coming and it would be perfect to hold a small gift.

My box has flown into the following challenges:
Crafting from the Heart - anything goes (Mon)
Papertake Weekly - anything goes (Tues)
In the Pink - for a special lady (Thurs)
Graph'it Markers - Shabby Chic - vintage colouring (March 13th)
Creative Fingers - #70 anything goes (Fri)
Allsorts - Spring is in the air (Sat)
One Stitch at a time - anything goes with women (Sun) Got a Special Mention
That Craft Place - Mother's day (Sun)
Crafts Galore - anything goes (March)

Sunday, 23 March 2014

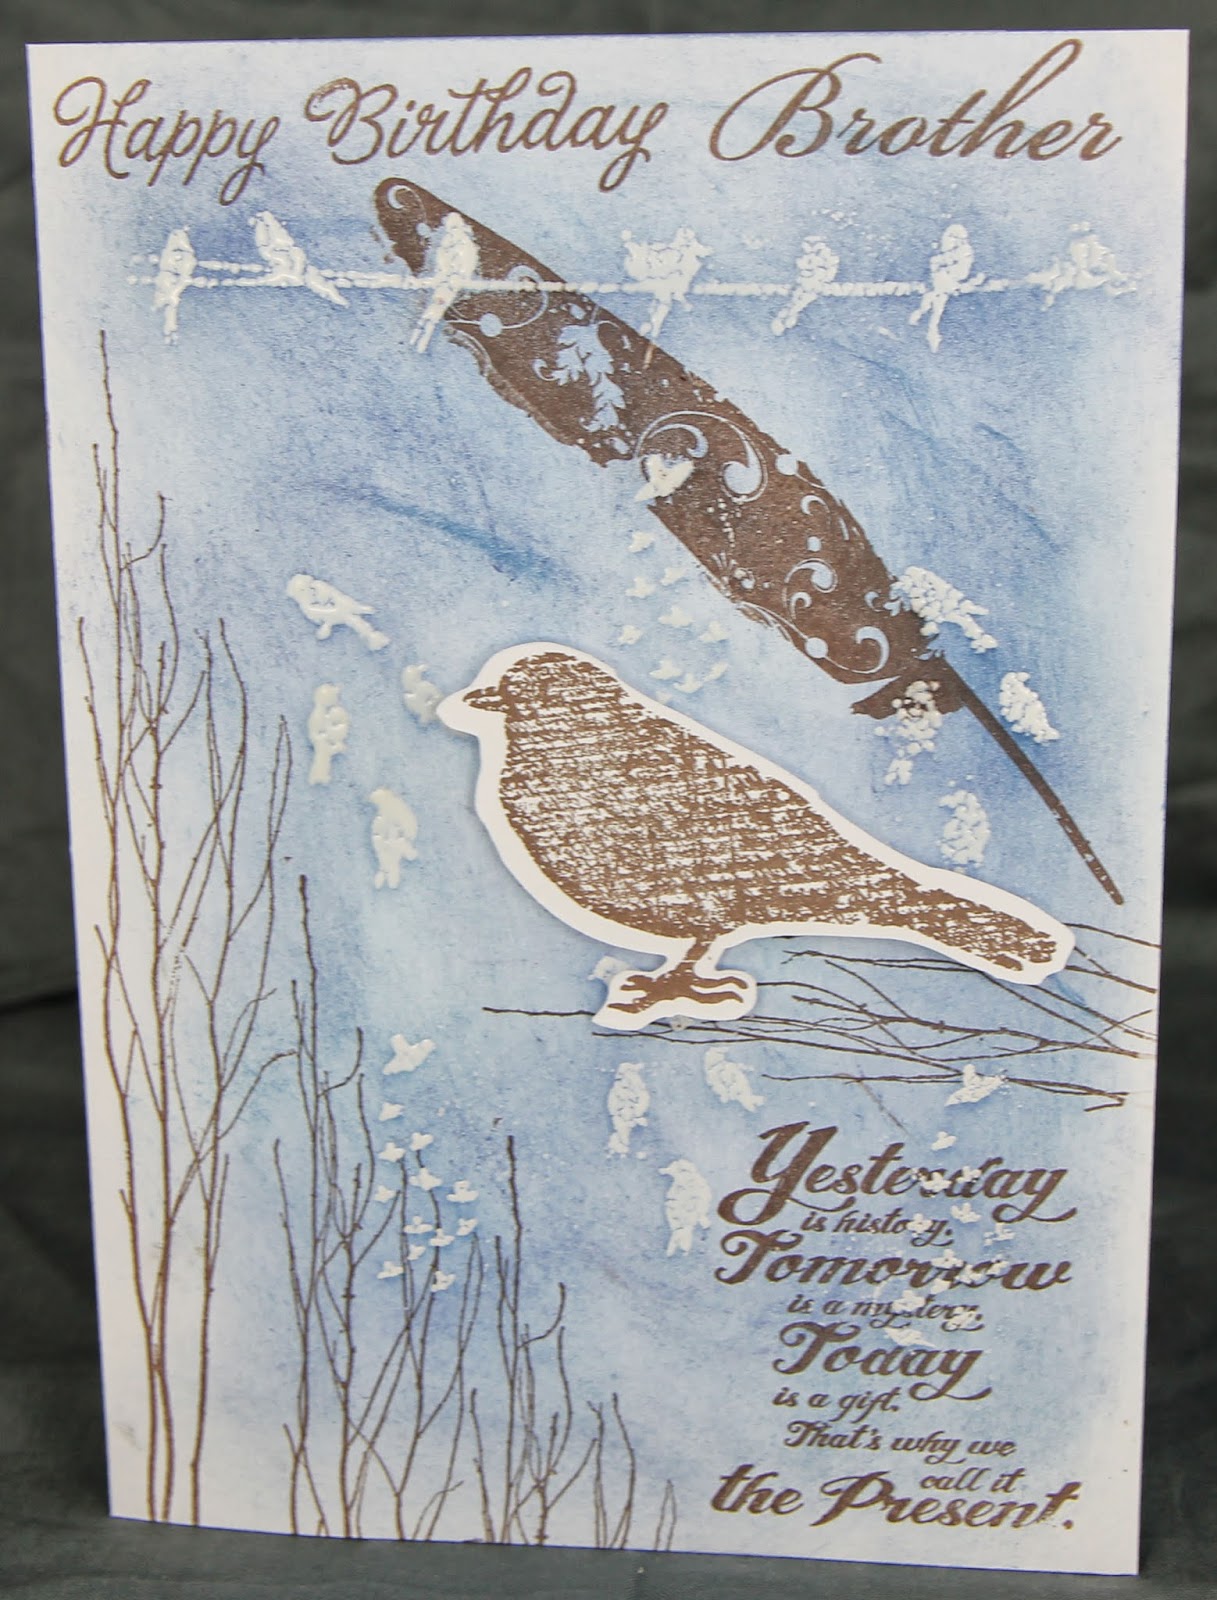
Happy Birthday Brother

 It was also my Brother's birthday yesterday, and he is a keen ornithologist so I made him a bird card. The background done directly onto the card blank is stamped and heat embossed in white and clear powder to form a resist, the stamps are Crafty Individual. Then I inked over the stamping with Distress inks and rubbed over the embossed images.
I stamped the branches, feather and bottom sentiment with Paperartsy stamps (rubbing over the embossed images again), and die cut then stamped the bird (I tried stamping then die cutting - which is when I found out the die is not the right way round to do that, I had to die cut, flip the die cut then stamp). Happy Birthday is a Hero Arts stamp, and Brother is a Papermania stamp.
Inside the card I used some Papermania Spring paper, also with blue and brown birds, and cut a slot to insert a gift card. Stamped sentiments are Paperartsy.
I was originally inspired to do the heat embossed background when a craft company on Facebook asked a question: if you used what you are wearing right now as inspiration - what sort of card would you make? I was wearing a dark blue fleece top with white silhouettes of birds all over it!
Happy Birthday Brother!

I have entered the following challenges:
Allsorts - All about the boy (Sat)
Cute Card Thursday - It's a wild world

Sunday, 8 December 2013

Quirky Christmas Treasure time!

I think I still have the altering bug after last week, and I bought this frame in a charity shop (is that the same as thrift shop in the USA, a charity shop is where people donate goods to sell to raise money for a cause, the cause runs the shop). I also had a previously unopened pack of treasure in the form of Tattered Angels Glimmer Glass, I was so awestruck I couldn't think how I could use these shapes on cards and give them away, and so it stayed put for a few years - until now!


The challenge at Quirky Crafts starting today, is to make a Christmas project and to use your treasure, this could be something like my treasure, or the last of something you can't get any more, or a personal keepsake.
It can be any project you like too, you just need to tell us what your treasure is and why it is so precious.
The very generous sponsor for this challenge is The Cutting Cafe who provided the team with some great images to use. I used Christmas Laundry Line and Christmas Sentiment Shapes on my upcycled frame. 
I painted the frame with one coat of gesso, then two coats of Fresco Snowflake, then allowed it to dry before applying Ice Blue Fresco then Squid Ink with blending foam. I inked the Christmas Sentiment Shapes with Distress inks. The Christmas Laundry Line is coloured with Promarkers, including silver for the stars, and I added Stickles glitter glue. The white stuff along the bottom of the image is glass ball gel medium, and in this photo it hasn't dried yet so I will replace the image when it does dry (image now replaced, I built the glass ball gel up a little more and it is as dry as it will get, and I went over the whole thing with sparkling Mod Podge to protect the image, not sure where the little line above the tree came from).
The Glimmer Glass is stuck to various parts of the frame with Decopatch which I hope will hold.
So hop on over to Quirky to see lots of lovely examples by the team, and to join in with the challenge which runs for two weeks.

I have entered the following challenges:
ABC  - A for Almost Christmas
Feeling Crafty - Christmas
Craft Mojo - Christmas
Passion for Promarkers - include a sentiment (Jan 7th)

Wednesday, 27 November 2013

WOYWW #234

I nearly forgot it was Wednesday again, and time to stomp over to Julia's den at The Stamping ground and proudly show your workspaces craft bomb sites , and visit some others (mainly more tidy ones).

Here is attempt number two at a hat for Kenny, from a free pattern I found via Raverly courtesy of  the talented and generous Sarah of Repeat Crafter Me blog, cute I think. This one is in Aran yarn, which I think is what Vanna's Choice is. I had to convert the USA stitches to UK ones, I wonder why they are different? Did the Irish immigrants of the old days get over there and forget what the stitches were called, or remember them but so vaguely they made a few up and changed a few? You can just see a corner of a swan doily that is waiting to be washed, once washed it needs to be pinned out to dry and in this weather not a great idea. I made it many many years ago!

 My first gorgeous model, chocolate ted had a head too big so it was bedtime bear who modelled here!
Sooty also modelled the hat, I think it is deeper than the owl hat that didn't really fit, this looks a much better shape so I am hopeful, it will be on it's way for Kenny to try in a couple of weeks, and if it fits I might make another one or two! The pattern goes right up to adult size, and the eyes were supposed to be buttons but on consulting a colleague who knows from experience, I crocheted some eyeballs again!

For Julia, I bought the box from the fish and chip shop where I saw them, it has never had fish or chips in it, I just liked it! Sort of thought about altering it, but I like it the way it is, at least for now (has been here a couple of years or three).

On the desk, I bought some EZ mount finally, from Paperartsy with a couple of small stamps and my first pot of Treasure Gold, and they sent me a freebie rubber stamp of a double decker bus, how cool and generous, thank you Paperartsy! So anyway, where was I, oh I know - mounting and cutting rubber stamps, but then they need putting away! I should be making Christmas cards!
Now I know I have a few people to return visits to for last week, I got round all the 7's, and a few of those folk who visited me and some favourites, then I got busy working on the Quirky challenge, and now sorting out next year's schedule (or trying to), contacting sponsors and waiting for replies so I can fit them in, and starting off next year's themes so we can get ahead a little for a change.


Saturday, 6 July 2013

The Alpha Challenge - B for Britannique


The Craft Barn Alpha Challenge is on B, and I hope I am in time just! I have done Britannique this time, with a variety of stamps from Little Claire, Craftwork Cards, Hobbycraft and some freebies, oh and the phone box is Art Impressions. Paint is Paperartsy Fresco, the red is white with some acrylic mixed in. Real postage stamps!