Welcome to my blog

Welcome to my blog and thank you for visiting today, I hope you will stay a while. Slide shows are at the bottom of this page. Follow my blog with Bloglovin


Friday, 25 January 2013

Glitter in my drawers ha ha

Here is my Hero Hearts card again, this time with just two mother of pearl buttons added, I think it is finished now.
I have entered this in the following challenges:
A Blog Named Hero - a golden oldie. I don't know if these are old enough stamps but I hope so and with hours to go they will have to do!

I recently won an Art Glitter contest I spotted on Facebook where you are shown an open pot of glitter and you have to guess which glitter colour and type it is from the hundreds on the web site. If you guess correctly you win a $25 voucher. The only drawback is that you have to pay postage. I picked out my 8 pots of glitter from the overstock section because that was where the best bargains were, and I submitted my order with voucher code and waited for Art Glitter to contact me with the postage amount which I was a little concerned about. Something went wrong with the system because I hadn't heard and 3 weeks later when I contacted them to find out what was happening they had dispatched the order and charged my card $44 or thereabouts. I was horrified and told them that I would never have authorised that amount which was more than the prize. They looked into it and told me that the wrong box was used, and refunded me half of the amount, phew and the glitter arrived yesterday. I now have so much glitter I have dedicated a Really Useful box to it, so there is space in the drawer with the Pearl Ex mica power and Twinkling H2O's it was sharing with, will have to find something to share now!
Oh I nearly didn't say which are the new pots - the 8 in the top right hand corner of the box!

Wednesday, 23 January 2013

Hero Hearts

I decided to take the same approach to Valentine's day as I did to Christmas, which was to get everything out related to the occasion, stamps, embellishments, ribbons, embossing folders, the only thing I didn't get out was all the dies. So I have been trawling through all of my stamps in search of love! I haven't gone through all of them I am sure. I am on Hero Arts right now, and this is a Hero Arts cling background stamp I have had for a year or so but not used before. I decided to stamp on Kraft card with black Memento ink, and this one was not meant to be used because it isn't perfect. (If you look closely you will see there are too many swirly bits one side, I tried to get two on a page and the stamp is just too wide for that). I was trying two colours, using Tria pens, to see if I like it better than just red, and I decided it was too pretty not to use to make a card. The sentiment is also Hero Arts stamped and embossed in gold, again this didn't come out perfectly. I added a piece of black grosgrain ribbon then die cut hearts using my new Dienamics die, and some freebie paper I think from Card Making magazine. I bought some black lace on the market yesterday which I think really looks nice. Is there anything else I can add? Maybe, lets see what the next version looks like! 

Tuesday, 22 January 2013

The Craft Barn Alpha Challenge - V


I only found out about this challenge at The Craft Barn blog yesterday and I have had a lot of fun with it! The challenge is to alter an old dictionary, a redundant one or a charity shop buy. You can also make tags or journal pages without a dictionary but you have to stick to the same thing right the way through this. Now I just hope my book stays in one piece or I will have to add it to pages and make a new book. 
The letter is V, and this is an old French dictionary of no great value as you can see, so I didn't hesitate (much) as I love books and it is hard to vandalise them. So I picked out my first word which is Valiant, meaning brave or courageous (courageux actually), gallant, robuste or hale and hearty or penniless according to the dictionary. I thought of my Rubbadubbadoo knight immediately and after painting the page with white gesso I got stamping. Oh before I started I outlined the word and meaning and then heat embossed them with clear EP, to protect it from the gesso, not sure it was a good idea! I stamped the castle in Memento grey, the knight in Brilliance black and heat embossed with black EP, and the seal with gold Brilliance and copper EP. I found it was not too easy stamping directly onto the book, I need to put a mouse mat or something under the page I think. I stamped the word brave also with Rubbadubbadoo stamps, and stamped an arrow and heat embossed that from an Autumn Leaves set I got in a sale and have never used, all the arrows are from the same set and the You Are Here sentiment. I die cut the V using Sizzix Shadowbox in copper metal sheet and a script paper. I decided the page looked too bare so I stamped the fluer de lis which I got free from Crafty Individuals with some other freebies when I purchased the music stamps. I decided to paint the by now curling edges of the page with Tim Holtz crackle paint in antique photo, this was an unopened pot I bought from someone and it was like thick mud - not sure if that is how it is supposed to be, it was difficult to paint!. Still not happy I sprayed the page with bronze Glimmer mist, this was my first Miranda type mistake - the green fleur de lis's started to run! So sort of happy I had done all I could and after drying the page with my heat gun I started on the word Vacance, holidays, vacation, take a holiday, go on holiday, which was on the other page. I painted the page first with gesso and heat dried it (I was running out of time by now) then painted the sea, beach and sky with acrylics, adding gold glitter to the beach paint. I used a Debbi Moore stamp set to stamp Summer and the shells on the beach, and a recent bargain Warren stamp from Happy Everything set by Craftwork Cards (isn't he the cutest?) onto white card and coloured it with Promarkers and Trias, and cut him out. I also stamped the sun and sheep cloud from a Hero Arts clear set called Sky's the limit. and that is it. Oh my other Miranda moment? I managed to knock the blue paint loaded brush onto my Valiant page and in attempting to clean off blue paint I managed to spread yellow on it too, scream!

So I may have messed this up totally but I had a good time doing it!


Monday, 21 January 2013

More Quirky Rainbow Bright


This is my second example card for the Quirky Crafts Challenge "Rainbow Bright" using Artsy Flower from Stitchy Bear Digital Stamps. I coloured the image with Trias and Promarkers, die cut with Nestabilities and added some gems for a bit of sparkle. The sentiment is an Elzybells stamp, with Brilliance ink in Peacock, which is blue and green but that doesn't show so well. I heat embossed the sentiment then rounded the corners with the Paper Gator and added some baker's twine.

I have entered this card in the following challenges:

Cute Card Thurdays - Diamonds are forever


Sunday, 20 January 2013

Quirky Rainbows


Caro set the second challenge of the year at Quirky Crafts, the first was incredibly popular with 97 entries and it took us ages to decide on winners.
The new challenge is "Rainbow Bright" and Caro wants to see rainbows, rainbow colours or both on your project. 
The challenge is sponsored by Stitchy Bear and Digital Delights, all images provided to the DT were from Stitchy Bear.
I used Strawberry House with Garden Gate and Stained Glass Snail together to make a little scene. I added a Hero Arts Rainbow and Sentiment from a clear set called Sky's the Limit, which has some very cute clouds, sun, and a star and more sentiments, my favourite is a cloud sheep which I hope to use soon.
I also added another bigger rainbow but I have no idea who made the rubber stamp. Ribbon was from WH Smiths in a sale a couple of years ago, and buttons from stash. I hope you can read the sentiment, it says "wishing you rainbows" and I stamped it with Kaleidoscope Baby Rainbow colour ink pad, it is a little pale. Nestabilities used to cut out the image, the frame and the sentiment and background. All images were coloured with Promarkers and Trias.

I am going to make a second card so pop back later to see that one.

I have entered this card in the following challenges:
I love Promarkers - Layer it up (Wednesdays)

Thursday, 17 January 2013

More Valentine's cards.


A few more of the vellum Valentine's. I like this purple version but that is the only peice of the pretty ribbon.


A bunch of Valentine's cards.

Inside the cards are finished with a matching insert and a white heart to write on.

I used some embossed card blanks I had in the box with real flowers, this was a viola from my garden. I added a little chalk to the embossed parts for colour but I didn't seal it, so I hope it doesn't drop off.


This card features rosebuds, I don't remember if I bought or dried these.


WOWYWW

Well it is a bit late as it is gone midnight so strictly speaking not Wednesday but as I am still up it is to me! 
Lots of Valentine's ideas in progress, see the Hero Arts hearts? I haven't actually used them before, and I have had them a long time, but I am still working on how to best use them. Lots of other bits going on, dried flowers and heart stickers which won't stick, and hopefully I will have some finished photos tomorrow and a heap of Valentine's cards ready to go to the shop.

Wednesday, 16 January 2013

Love is in the air


I stamped Stampendous musical hearts with Versafine and heat embossed them, and added them to this gorgeous embossed purple card, and I have used nearly all I have of this. The corners are punched with Kreaxions punch, and this is layered onto purple card which is edge punched with a Martha Stewart punch. This is mounted on a white card blank. The sentiment stamp is also heat embossed and is by PSX. Ribbon from Crafty Ribbons, and brads are Papermania.

Same hearts this time stamped onto parchment card, the corner stamp is by Heidi Swapp, and I found this rose patterned vellum that I have had for ages, tore a corner to reveal the stamped sentiment and tucked a heart under it, added another on top and again Crafty Ribbons ribbon.


Saturday, 12 January 2013

Sweet sweet music

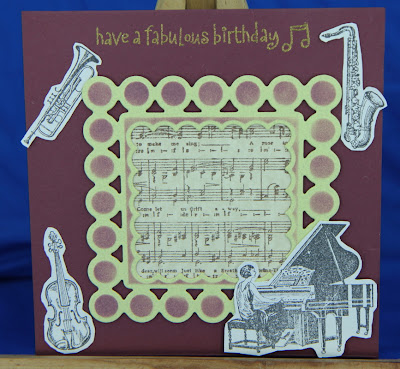
In honour of the Bradford on Avon Music Festival this weekend at the Wiltshire School of Music I have been making musical cards. I only just saw these stamps by Crafty Individuals at the beginning of the week and had to have them, and they came really quickly with some freebies, thanks Crafty Individuals! 
I stamped the music stamp onto some marled card, and cut a frame using a Spellbinders die, which I cut the centre out of to make a frame. The reason you are seeing three photos of this card is because I tried 3 different dies in the centre to get different effects. I embossed the frame then used the die as a stencil to shade it with plum Memento ink, and then cut the music sheet to fit behind. I stamped the piano and instruments and cut them out to add, oh and I should have said the first thing I did was stamp and heat emboss the sentiment using stamps from a Hero Arts clear set.

Do you like this frame the best? I just used a square Nestie in the middle here.

Or this one? I used the next size down of the main die this time.


They are all easel cards, inside I added a panel of the green card, some ribbon with musical notes, some Prima blooms and a gem, and a French horn, or is that a tuba?

Slightly different inside, I used Tim Holtz Ideology tape on this one.


I had high hopes of making more cards using this wonderful Dreamweavers stencil, and I tried it embossing it by passing it through the eBosser ( I had several attempts before getting anything like what I wanted, the one with two pieces of card to shim it worked best but then the machine reversed it and wouldn't accept that a second time, after which all attemps were not so good), then I tried the Big Shot, the Big Shot gave me a better definition, and I tried the embossing paste. I had a few problems with the ebosser and didn't end up with the result I had hoped for. I got in a mess with the paste trying to do the black piano keys only despite have the little brass masking tool, well I just got in a mess! So this one ended up with the dry embossed image cut from the keys, and I used black Promarker pen to mark the embossed notes, words and the black keys. I also used Cordinations Black Magic embossed with a music note folder and sanded, then die cut with Grand Nestabilities die. I mounted them on gold and added Happy Birthday cut out of some printed card I bought ages ago at a show, and I used Sizzix ;Lollipop dies for that.

I am entering the ABC challenge E for embossing, take your pick the cards above all have embossing!


These little characters are stamps which I think I bought from Smiling Summer Girl on ebay many years ago, I think they are mythical folk art figures maybe Mexican and beginning with X but I could be wrong! It is really bugging me that I can't remember what they are called. The set includes the figures in different sizes, so the block comes smaller, and the small individuals come in a bigger size. The sentiment might be from her too. If anyone knows please tell me. Anyway this is a CAS or clean and simple card, I used Kaleidoscope ink and stamped directly onto the card.

When the new stamps arrived I tried to use every bit of the one EZ mount sheet I had left, and some scraps! So the Crafty Individuals had to be mounted so I could use them and as many Krafting Kimmies as I could fit!
Ermmm, I think I need to order some more EZ mount!

Shaun and Richard outside in the cold and very wet laying a new base for the new greenhouse to come, with toughened glass so that Kenny doesn't have any accidents. The old greenhouse is being used as shelter here, and will be going to a new home next week!


Thursday, 10 January 2013

This is really great advice, Moderate or Verify not both, I say Moderate every time!

Copied from blogmamasusan because I hate word verification, and even worse when people use both that and moderation when they don't need it!


Spammers can still post with verification, but you have the great satisfaction of ZAPPING them into spam if you moderate and that teaches blogger to recognise the spam in future and do it for you! You can always check your spam folder and take out any that shouldn't be there too.

Everything below here is copied from Susan's blog. Please share it with everyone, tweet, facebook, blogger.....


Commenting: Verification or Moderation, but not both!

COMMENTS

We all want them but we want good comments, not spam or obscenities or links to porn sites. Blogger has two good ways of helping us make sure the bad stuff doesn't get through.


Comment Moderation


You get to this option by clicking Layout, then Settings, then Posts and Comments.


Comment Moderation has 3 options:

Always - the blog owner must approve every comment before it appears.
Sometimes - the owner moderates comments after a period of time.
Never - anything goes.

This option is a personal preference. Personally, I don't moderate this blog or my inspirational site, SusanStilwell.com (a Wordpress site).

Word Verification


This option is found under Comment Moderation, and has 2 options:
No - the comment immediately posts.
Yes - the commenter is prompted to type in garbled text. As of this writing, there is a second field that's a blurred photograph of numbers.

In theory, this is a good idea. It keeps automated commenting programs from leaving unwanted messages. 

In reality, it's a pain in the neck. Some of the text strings are indecipherable and I've had photographs that were completely black with no images. Plus, I'vepurposely entered wrong data and the comment posted anyway!

Word verification will also keep visually impaired people from leaving comments. As hard as it is for us to see, it's impossible for a visually impaired person to hear because their software thinks the garbled text is a word. Very frustrating!

Moderate or verify, but NOT both! 

(Tweet & spread the word!)


It's like wearing suspenders with a belt! Plus, it's annoying. Make your reader's experience on your blog as pleasant and simple as possible. You might even try taking everything off and running naked for a while!

But only on your blog. Don't get crazy...

Happy blogging!

Susan

Tuesday, 8 January 2013

Live in the sunshine

I love that sentiment, don't you?
The card and main image were all part of an MFT kit I bought a long time ago, and finally I got to use it. It was almost too pretty to use! The stamp is a Who's That Girl which I think may be a retired stamp, but you can still get others in this range, and the "sunshine" with little dog face is from a wonderful set called Congrats all Round, which has many mix and match elements.
I coloured the main image and centre of the Sun image with Promarkers and Trias, and the outer part of the Sun is inked with Memento ink pads.
Now the brief was to use Dienamic dies and I did order some but they are nowhere to be seen, and I realised they must have been on pre-order - sob, but they will be here soon I hope, too late for this card.

I wanted the inside of the card to be pretty too, so more papers from the MFT kit.
For anyone who doesn't know: MFT stands for My Favourite (USA Favorite) Things, who make a great range of clear stamps as well as wonderful Dienamic dies, as well as card stock, buttons and lots more, in fact all you need to make great cards.
I made this card to enter the fabulous MFT contest, I fear it might be too late!